Camera-ready makeup means slightly more definition and shine control than your everyday face, so your features hold up under lights instead of washing out. The order that works: hydrate and prime the skin, apply an HD-friendly foundation with no SPF, define your eyes and brows, then set everything with powder and a setting spray. Pack blotting papers, a lipstick, and a compact powder for touch-ups. Get this sequence right and the camera does the rest.
TL;DR:
- Applying an HD-friendly foundation without SPF and setting it with powder prevents flashback and appearance of uneven texture on camera.
- Use a silicone-based primer for dry skin or a mattifying primer for oily skin to control shine and smooth skin before foundation application.
- Brighten the inner corners of the eyes with a subtle highlighter and avoid heavy lower lash liner to prevent shrinking or smudging under bright studio lights.
- Contour on camera should be subtle, using cream formulas to add dimension, and highlight only small points like cheekbones and the cupid’s bow for a natural glow.
- Regular touch-ups with blotting papers, powder, and lipstick every 45 to 60 minutes help maintain a fresh, camera-ready look during long shoots or video calls.
Table of Contents
- The Camera Ready Makeup Checklist You Can Follow in 20 Minutes
- Building the Perfect Base for HD Cameras
- How to Make Your Eyes and Brows Read on Camera
- What Lip Color and Highlight Actually Photograph Best
- Your Touch-Up Kit for Long Shoots and Video Calls
- When It's Worth Booking a Professional
- Contouring and Highlighting That Actually Hold Up on Camera
- The Tools and Brushes That Make the Biggest Difference
- Keeping Makeup Intact Under Different Lighting
- Adjusting Camera Ready Makeup for Every Skin Tone
- Common Mistakes That Ruin an Otherwise Good Look
- Ready to Book a Pro? Here's How VÉLOURA Makes It Simple
- Why We Think Camera Confidence Is About More Than Products
- Sources
- FAQ
The Camera Ready Makeup Checklist You Can Follow in 20 Minutes
Getting camera ready doesn't require a professional kit or hours in front of a mirror. It requires the right steps in the right order, done well.
- Prep the skin. Cleanse first, then hydrate with a moisturizer suited to your skin type. If your skin tends toward flaky or dry patches, exfoliate gently the day before your shoot, never the same morning, since fresh exfoliation can leave skin pink or reactive on camera.
- Prime with intention. Skip a one-size-fits-all primer. Oily skin does better with a mattifying formula that controls midday shine; dry or textured skin needs a silicone-based smoothing primer that fills fine lines and blurs pores before foundation goes on. Hydrated skin and the right primer are the two variables that matter most, because HD cameras exaggerate texture and dryness far more than the naked eye does.
- Choose an HD-friendly foundation, and leave SPF out of it. Most sunscreen formulas contain physical or chemical filters that reflect light unevenly, creating a ghostly white cast on camera known as flashback. Apply foundation in thin layers with a damp sponge or dense brush, building coverage where you need it and blending well past your jawline so there's no visible line where makeup ends and skin begins.
- Conceal selectively. Brighten the inner corners of the under-eye area, but stop short of going several shades lighter than your skin. Over-brightening creates a chalky, reverse-raccoon effect under studio or ring lights that reads worse than the dark circles you were covering.
- Powder strategically, then lock it in. Spot-set the T-zone and chin rather than dusting your entire face with heavy powder, which can look flat and matte in a way that ages skin on camera. Finish with a setting spray to help everything sit for hours instead of minutes.
Each step builds on the last. Skip the primer and your foundation grabs onto dry patches. Skip the powder and shine breaks through by minute ten under hot lights. Follow the order and you get a face that holds up whether you're on a video call or under a photographer's strobes.
Building the Perfect Base for HD Cameras
High-definition cameras and 4K video pick up what your bathroom mirror never shows you: enlarged pores, dry patches, and uneven texture. That's why experts recommend prioritizing skin hydration and a long-wear smoothing primer before a single drop of foundation goes on.
- Use a silicone-based primer to blur texture if your skin is dry or aging; switch to a mattifying primer if you run oily or shine easily by midday.
- Choose foundation labeled for photography or HD use, and confirm it's free of SPF, since sunscreen ingredients cause flashback under flash or bright studio lighting.
- Set only where you need it. Powdering the T-zone and chin controls shine without flattening the glow on your cheeks and forehead.
- Add contour and blush after powder, using a cream or cream-to-powder formula so color sits on top of skin instead of sinking into it.
Pro Tip: Apply blush and contour slightly stronger than you would for daytime wear. Camera lights have a flattening effect that mutes color, so what looks like "too much" in the mirror often reads as perfectly natural on screen.
How to Make Your Eyes and Brows Read on Camera
Eyes carry a video interview or headshot more than any other feature, and the fix is depth, not more product.
- Use three neutral shadow shades: a light tone on the lid, a mid-tone through the crease for depth, and a deeper shade along the outer corner to add dimension without looking heavy.
- Line close to the upper lash line only. Skip heavy lower liner, which tends to shrink the eye and read as smudged under bright lights by hour two.
- Reach for a lengthening mascara for most shoots; individual lash clusters work better for close-up headshots where a fuller, more sculpted lash line matters and clumping isn't an option.
- Fill sparse spots in your brows with a pencil or powder that matches your natural color, then brush them into place. Well-groomed brows frame the whole face and anchor the rest of the look.
Video interview guidance from professional photographers consistently points to neutral, well-blended eyes over bold color, since first impressions on a screen form in seconds and busy eye makeup pulls focus from what you're saying.
What Lip Color and Highlight Actually Photograph Best
Your safest bet is a "my lips but better" shade, one or two tones deeper than your natural lip color, in a long-wear formula that won't need constant reapplication.
- Skip anything with SPF or heavy shimmer on the lips; both can catch light unpredictably on camera.
- Reserve highlighter for small, specific points: the tops of cheekbones, the bridge of the nose, the cupid's bow. Shimmer and glitter reflect studio lighting unpredictably and create blown-out hot spots that a photo editor can't always fix.
- Keep everything else matte, including bronzer and setting powder.
- Before you hit record or the shutter fires, take one test photo or selfie in the exact lighting you'll be using.
Run this five-point check before anything else: skin looks matte where it should, no visible foundation line at the jaw, brows are even, lips are set, and nothing shines except the two or three points you chose on purpose.
Your Touch-Up Kit for Long Shoots and Video Calls
A camera-ready look only holds if you're ready to maintain it. Pack these five items and you can handle almost anything a two-hour shoot throws at you.
- Blotting papers, for lifting oil without disturbing makeup underneath.
- A translucent powder compact, for quick spot-setting between takes.
- Your lipstick, since lip color fades faster than anything else on your face.
- A mini mascara, for lashes that flatten after hours of blinking under lights.
- A few Q-tips, for cleaning up smudged liner or stray powder without redoing your whole eye.
Pro Tip: In humid conditions or under hot studio lights, blot first and powder second. Powdering over oil just creates a cakey layer that looks worse on camera than the shine did.
If you're filming for several hours, plan a touch-up every 45 to 60 minutes rather than waiting until makeup visibly breaks down. Small, frequent fixes photograph better than one big correction.
When It's Worth Booking a Professional
Weddings, TV appearances, headshots, and auditions carry higher stakes, tighter timelines, and unforgiving lighting. A licensed makeup artist brings lighting-aware product knowledge and can execute a touch-up in under a minute between takes. VÉLOURA Beauty On Demand connects clients with vetted pros for mobile makeup and work event styling wherever the shoot happens.
Contouring and Highlighting That Actually Hold Up on Camera
Contour reads differently on camera than it does in a mirror, and the biggest mistake is treating it like a daytime technique scaled up. Camera lighting flattens color and softens contrast, which is why subtle contouring and slightly stronger cheek color than everyday wear tend to look most natural on screen, even though they'd feel like too much in person.
Stick to cream or cream-to-powder contour products rather than heavily pigmented powders. Cream formulas blend into skin instead of sitting on top of it, which avoids the streaky, muddy look that shows up under harsh lighting. Apply contour along the hollows of the cheeks, the sides of the nose, and the jawline, then blend with a damp sponge until you can't find a hard edge.
Highlight comes last, and less is genuinely more. Dust or dab a small amount onto the high points of the face: cheekbones, brow bone, the center of the nose. Skip large-area shimmer entirely. A tiny amount at the inner eye corner or on the cupid's bow adds a lit-from-within quality without creating the reflective hot spots that ruin an otherwise clean shot. If you're unsure how much is too much, apply half of what feels right, take a test photo, and add more only if the shot genuinely calls for it.
The Tools and Brushes That Make the Biggest Difference
Product choice matters, but application tools decide whether that product looks airbrushed or patchy on camera.
A damp makeup sponge remains the most reliable tool for foundation because it presses product into skin rather than dragging it across the surface, which minimizes visible brush strokes and streaking. For powder, a large, fluffy brush picks up less product and deposits it more evenly than a small one, which matters when you're trying to avoid the cakey buildup that shows up under bright lights.
Angled brushes give you more control for brows and eyeliner, where precision matters more than coverage. A dense, flat brush works best for cream contour, since it presses color into skin instead of streaking it across the face the way a fluffy brush can.
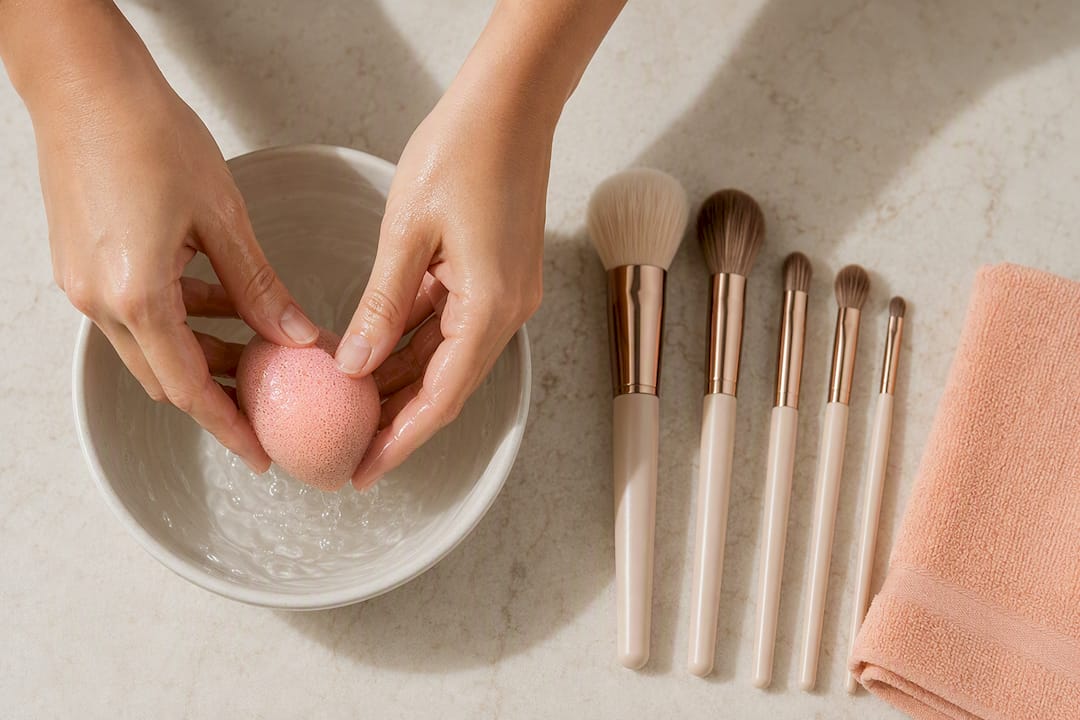
Keep your tools clean. A brush loaded with old product, oil, or bacteria doesn't blend as smoothly, and buildup on bristles is one of the most overlooked reasons a base that looked fine at home starts to look patchy on set. Wash sponges after every use and brushes at least once a week if you're shooting often.
Keeping Makeup Intact Under Different Lighting
Studio lights, natural daylight, and the blue-toned glow of a laptop camera each treat makeup differently, and a look that survives one won't automatically survive another.
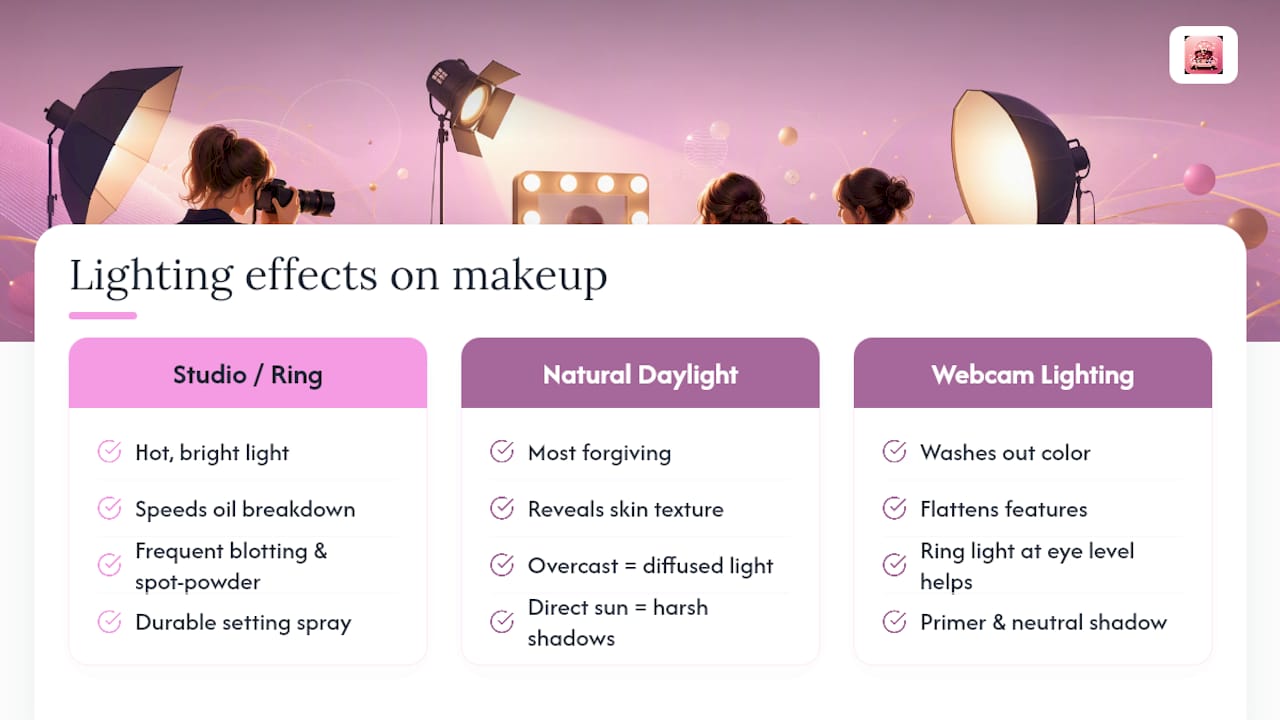
Studio and ring lights run hot and bright, which speeds up oil production and breaks down makeup faster than normal wear. Plan for more frequent blotting and spot-powdering during long studio sessions, and lean on a setting spray built for longevity rather than a light finishing mist.
Natural daylight is the most forgiving but also the most revealing of texture, so skin prep matters even more for outdoor shoots. Overcast days diffuse light evenly, while direct sun creates harsh shadows that can exaggerate contour if you've applied it too heavily.
Webcam and video-call lighting tends to wash out color and flatten features, which is part of why primers, neutral eyeshadow, and setting spray come up so often in advice built specifically for remote work. A ring light placed at eye level, just behind your camera, does more for your on-screen look than almost any product swap.
Adjusting Camera Ready Makeup for Every Skin Tone
Foundation and powder that oxidize or flash back look different depending on your undertone, so shade-matching in the exact lighting you'll be filmed in matters more than shade-matching at a store counter.
Lighter skin tones tend to show flashback most visibly, since SPF particles reflect light against a paler base, which is one more reason to confirm your foundation is SPF-free before a shoot. Medium and olive skin tones often shift warmer under studio lighting, so testing your foundation match under the actual lights you'll use, not window light, prevents an unpleasant surprise on screen.
Deeper skin tones frequently get underserved by foundation lines that go gray or ashy on camera, even when the shade looks correct in daylight. Look for formulas specifically labeled for a full undertone range, and warm the shade slightly with a bronzer or cream blush if the foundation reads flat under artificial light.
Across every skin tone, the same rule holds: contour and highlight should add dimension relative to your own coloring, not lighten or darken your face into a different shade altogether. A highlight shade with too much white base will look chalky on deeper skin, and a contour shade that's too cool or gray will look dirty rather than sculpted on warmer undertones. Test everything against your jawline in your actual shoot lighting before committing.
Common Mistakes That Ruin an Otherwise Good Look
Most camera-ready makeup problems trace back to a handful of repeat mistakes.
Wearing SPF in your foundation or powder is the single most common cause of flashback, that pale, ghostly cast that shows up in photos even when your skin looked fine in person. Double-check every product in your base, including tinted moisturizer and setting powder, since SPF hides in more formulas than people expect.
Overusing shimmer is a close second. Matte products across bronzer and powder, with highlighter reserved for tiny strategic points, consistently outperform an all-over shimmer look, which tends to create distracting hot spots the moment a light hits it directly.
Trying a new skincare treatment or product right before a shoot is another frequent misstep. Professional makeup artists advise against dramatic skincare changes right before filming, since irritation, peeling, or breakouts from a new product show up clearly under bright lights.
Rounding out the list: over-brightening under the eyes until it looks chalky, skipping a test photo in the actual shoot lighting, and applying makeup so lightly that features disappear under strong light. Camera-ready isn't about wearing more makeup. It's about wearing the right amount, in the right places, for the light you're actually stepping into.
Ready to Book a Pro? Here's How VÉLOURA Makes It Simple
Skip the DIY guesswork for the moments that matter most. Licensed, background-checked makeup artists can come directly to your home, hotel, or office for lighting-aware application and fast touch-ups without driving anywhere or sitting in a salon chair.

Booking takes minutes through the VÉLOURA app or website: pick your service, choose a time, and a vetted pro arrives with a full kit built for photos and video. Sessions typically run from a focused touch-up to a full glam application, depending on what your shoot or event calls for. If you're prepping for a wedding, TV appearance, or headshot session in Los Angeles, browse mobile makeup services near you or check availability on the Los Angeles locations page to see what a pro-led session looks like before your next big moment on camera.
Why We Think Camera Confidence Is About More Than Products
Camera-ready makeup isn't really about the products. It's about walking into a room, a video call, or a photo session feeling like yourself, just slightly more defined. VÉLOURA Beauty On Demand exists because that kind of confidence shouldn't require a salon trip or hours of preparation. Whether you're prepping for an audition or a wedding day, a licensed pro at your door can make that moment feel effortless.
— VÉLOURA Beauty On Demand
Sources
This routine draws on guidance from working photographers and professional makeup artists, including specifics on skin prep and non-SPF foundation, video interview technique, and shimmer and flashback warnings from on-set professionals. Skin health fundamentals also draw on pre-shoot hydration guidance.
- Makeup for photography: What are your favorite tips?
- The pros of professional makeup for photography
- Makeup tips for headshots
- How to be camera ready for set - Central Casting
FAQ
What does camera ready makeup mean?
It means makeup applied with slightly more definition, color saturation, and shine control than daily wear, so features hold up under studio lights, flash, or HD video instead of washing out.
Is camera ready cosmetics legit as a concept, or just marketing language?
It's a legitimate, practical category built on real technique differences, including SPF-free foundation to avoid flashback, matte powders to prevent hot spots, and stronger cheek and lip color to counter how camera lighting flattens tone.
What kind of makeup looks best on a camera?
Matte to satin finishes with strategic, small highlights photograph best, paired with neutral eyeshadow, defined brows, and a "my lips but better" lip shade in a long-wear formula.
What are camera ready cosmetics?
They're products chosen specifically to avoid flashback and shine, typically HD-friendly foundations without SPF, translucent setting powders, matte bronzers, and long-wear formulas that resist breakdown under hot lights.
Should I do my own camera ready makeup or hire a professional?
DIY works well for everyday video calls or casual photos if you follow the skin prep, primer, and setting steps closely; for weddings, TV, or professional headshots, a licensed artist from a service like VÉLOURA Beauty On Demand brings lighting-aware product knowledge that's hard to replicate alone.